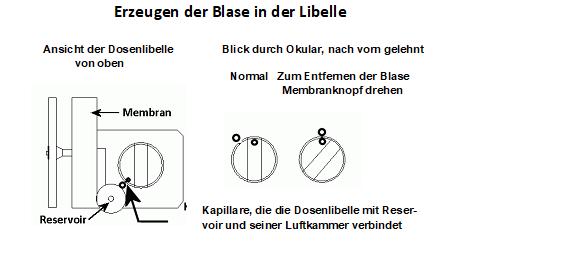
 If you were to open your Mk IX you would see in the
left half of the instrument the bubble chamber assembly. The left
hand drawing above shows a view from directly above the chamber
when it is in a normal (vertical) operating position. The right
hand sketch shows the view as seen through the eyepiece, I have
exaggerated the size of the drilling just to give you some idea
of its position.
Wenn Sie Ihren Mk IX öffnen, sehen
Sie in der linken Hälfte des Instruments die Dosenlibellenbaugruppe.
Die linke Zeichnung zeigt die Libellenkammer von oben, wenn sich
diese in normaler Betriebsposition befindet. Die Skizze rechts
zeigt die Ansicht durch das Okular. Die Bohrung ist zur Verdeutlichung
ihrer Position grösser gezeichnet, als sie in Wirklichkeit
ist.
To check the bubble:- Position yourself under a source
of light so that light comes through the frosted window with an
open shutter on top of the instrument. Set in maximum sun shades
so a minimum of light comes in through the front. Look through
the eye piece. You should see a circle. There may or may not be
a visible bubble in this circle. The bubble chamber forms a "Bulls
Eye" type of level, not a standard tubular "Builders"
level. The bubble will centralise when the instrument is vertical.
You will notice at about the 10 O'clock position a small notch.
If you have a large bubble in view, lean forward and to the right
so this notch is at the 12 O'clock position. Now wind in and out
the diaphragm knob gently, the bubble of air should leave by the
notch, which is actually a tube into the reservoir and should
be replaced by liquid. To generate a bubble stand the instrument
vertical and turn the diaphragm knob clockwise, This action will
increase the volume under the diaphragm, dragging fluid from the
reservoir till it is exhausted and the air above it is drawn in
forming a bubble. Take care not to force anything.
Überprüfen der Luftblase:
Positionieren Sie sich unter einer Lichtquelle, so dass das Licht
durch den geöffneten Verschluss oben auf dem Instrument und
durch das mattierte Fenster einfällt. Stellen Sie die kleinste
Sonnenblende ein, so dass nur ein Minimum an Licht von vorn eindringt.
Schauen Sie durch das Okular: Sie sollten jetzt einen Kreis sehen.
In diesem Kreis ist möglicher-weise bereits eine Luftblase
zu sehen. Die Blasenkammer ist als Dosenlibelle ausgebildet, nicht
als röhrenförmige, wie bei einer normalen Wasserwaage.
Die Blase zentriert sich, wenn das Instrument genau vertikal positioniert
wird. Etwa um die 10-Uhr-Position werden Sie eine kleine Kerbe
bemerken.
Entfernen der Blase: Wenn Sie eine große Blase im Blickfeld
haben, beugen Sie sich nach vorne und nach rechts, so dass sich
diese Kerbe in der 12-Uhr-Position befindet. Drehen Sie nun den
Membranknopf sanft hinein und heraus. Die Luftblase sollte nun
durch die Einkerbung und die Kapillare zum Reservoir gelangen
und dann aus ihm durch Flüssigkeit ersetzt werden.
Erzeugen der Blase: Stellen Sie das Instrument senkrecht auf und
drehen Sie dann den Membran-knopf im Uhrzeigersinn. Dadurch wird
das Raumvolumen unter der Membran vergrößert, durch
den entstandenen Unterdruck solange Flüssigkeit aus der Luftkammer
gesaugt, bis die Luft darüber in die Dosenlibelle eindringt
und eine Blase formt. Achten Sie darauf, nichts zu erzwingen.
Checking IX

